Showing posts with label how-to. Show all posts

Thursday, July 18, 2013

Swimming Mermaid Tail Tutorial - How I made my new Neoprene tail

It's finished!  It's finally finally finished!

Well, except for all the additional decorating and sequining and seaweed and such.  But it's finished enough for Prime Time.


How to Make a Mermaid Tail

Materials:

  • 1 sheet of 3 mm dark green neoprene (I got mine from Seattle Fabrics)
  • A Monofin - I got the "Rapid" from FINIS.  If in doubt, get the bigger foot-size.  You won't regret it.
  • 1/2 yd of Clear, lightweight vinyl for the wiggly fins - I got mine at JoAnn Fabrics.
  • A small piece of leather for the stomp-pad.  I got a used leather jacket from a thrift store and cut it from that.
  • Sparkly green spandex for the waistband
  • Jones Tones Metallic 3-D paint in lots of colors - I got the 8.9 oz bottles of blue swirl, teal, jade, emerald, sage, moss, black metal, and ivory, and a smaller bottle of violet.  
  • Holographic glitter
Notions:
  • A big roll of 2" velcro
  • 2 heavy duty snaps
  • about 1 yard of 2" non-roll elastic for the waist band
  • Heavy-duty upholstery thread and leather needles
  • Pretty decorative thread for edging
  • Paint brushes & sponges for painting

Process:


Design: 

First, I drew.  I sketched, I colored, I planned and schemed and designed.  I wanted this tail to be a little more "realistic" than my last tail, which had fabric fins and sequin trims and looks a little more cartoon-ish.  When I came up with a shape and color scheme I liked, I sketched it out with a silver sharpie on the back side of my neoprene to make sure I had enough.  I actually ended up having to piece one little section on the back, but it turned out to be not-too noticeable in the end so I consider that a Win.  

Patterning / Sizing:  

The neoprene is pretty stretchy, which makes sizing fairly easy, but adding the paint takes a whole lot of the stretch away.  A good technique is to lay down on the neoprene and have someone trace your outline.  Make it bigger than you think you need - it's always easy to make it smaller, but if it's too small there's no going back!

For the fluke, just be sure your monofin will fit snugly inside.  Trace around it and add a little extra for seam allowance at the edges.  Remember it'll get pretty thick around your ankles so leave plenty of room there too.

I plan to use this tail at a lot of events and parties, so I wanted to make it two pieces.  This way I can get into the top half and still be able to walk around (sort-of) instead of relying on a handler to carry me from my car or changing room all the way to the water.   I made the joining line a "v" shape so it's not quite as obvious that it's a seam.

Making the Basic Tail

I cut the tail out and made little darts in the back, to help it curve in at the top.  Then, I added the soft side of the velcro to the inside of the top half.  It is MUCH easier to get that on now before it's sewn together and painted!

Then I sewed the side seams and tried it on.  I did a lot of adjusting at this stage, getting the length right and the width right.  It's hard to change any of that once the tail is painted, so I had to be pretty sure it was right.


Stomp Pad

The first place mermaid tails wear out is underneath the heels.  We try and try NOT to stand up in our tails, but we're only human!  (see what I did there?)  It's kind of unavoidable if the tail gets a lot of use.  So I worked a stomp pad into the design.  I made it out of leather, cut from an old leather jacket I got at the thrift store for $5.  I just basically traced the biggest teardrop shape I could from the biggest unbroken piece of leather in the jacket (the back) and cut it out.  I edged it using a rolled edge stitch on my serger, then painted it.

This was a great place to practice and perfect my scale-painting technique.  The Jones Tones paints are delightful - they're glue-based, and easy to work with and they shimmer and shine.  I tried to use all the different colors in varying amounts to create a gradient effect.  I sprinkled the whole thing with holographic glitter before the paint was dry, so the glitter is effectively part of the tail.


I made a second one for the front side, for symmetry.  I used a neoprene base for this one since I didn't have any more leather and the neoprene leaves a smoother finish under the paint.


Wiggly Fins / Trim

To hide the seam, I made some seaweed-style fringe "fins" to line the top part of the tail.

Fringes (taken after the tail was painted, but I sewed them on before painting)
First, I sponge-painted a thin layer of Jones Tones paint onto the clear vinyl.  I did 3"strips of light green, darker green, and jade blue.  I cut the strips apart and then cut the fringes (leaving about 1" of uncut vinyl for attaching at the top).  I layered the 3 different colored strips of fringe and sewed them together.  Then I sewed them to the "skirt" part of the tail.

I also made some longer clear fringes, the width of the bottom of the fluke, and sewed them on.
Fluke, with clear fringes at the bottom and the stomp pad in place. 

Painting

When I was sure my upper tail fit well, I started the painting process.  This took a Very. Long. Time.  I masked the fringe fins, then did a couple thick paint coats along the edges first, to try and hide the seam lines a bit.

Then, starting at the bottom so they layered well, I painted the scales one at a time.  I made sure to line them up in an arc, rather than in a straight line from left to right - scales should flow, not march like soldiers, wot?  This was time consuming but SUPER satisfying.

In my design, the tail is lighter in the center and darker at the edges with a gradient effect.  I think it turned out lovely.

With regards to the design for the fluke, I really still didn't know what I wanted it to look like at this point.  I'd done about a dozen different drawings, but just wasn't "nailing" it.  So I laid the pieces of the tail out and took a picture, and then played with it in photoshop for a while until I came up with this design:


I was not sure if the 3-d paint would really be able to give me that much definition, but I gave it a shot and it turned out surprisingly well.

I started on the back (since if I screwed up, I wouldn't have to see it as much).  First I did a base coat of ivory white: 

You can see where I had to piece the neoprene!
Then I added the veins and did the painting with sponges, to blend the colors together.


I finished the whole tail using this method, then decided there wasn't nearly enough texture so I added another layer of paint and applied it using a large-toothed comb to make texture and "veins" all the way through.  Then I added glitter (of course!) before the paint dried and.. wowza.  It turned out nice.


Assembly & Finishing 

I sewed the front and back of the fluke together with my serger, leaving the bottom open.  This was super tricky - the sewing machine wants to stick to the paint.  I used leather needles (sharps) and intrinsic upholstery thread (super strong!) and ultimately got it to come together, after much frustration.  Then I fitted the whole thing and added the velcro onto the fluke where it would line up correctly with the velcro on the top.  

I added a couple more layers of paint over the seams and the edges of the fluke, and then slid the monofin up inside.  I stitched the bottom closed, leaving openings every few inches for drainage (if you stitch the whole tail closed it'll fill up with water and swamp you).

I added the waistband at the top, so the back doesn't gape open and show my butt crack - I have very round hips and a very small waist so this is a problem for me with skirts and jeans and any clothing that's not yoga pants, really, but lots of mermaid tails don't bother with elastic waistbands.  

I basically made a tube out of the shiny green spandex, threaded the right amount of elastic through (carefully and exactly measured by quickly wrapping it around my waist and eyeballing), then sewed the spandex onto the top of the tail.  

Lastly, I hand-sewed a heavy duty snap to the front and back at the point of the top part of the tail to keep it down. 

Conclusions

In conclusion.. I LOVE it!  It's a zoomy little tail - it seems faster and lighter than my previous one, with better drainage.  

I still want to add more vinyl fins to the bottom, probably colored since the clear vinyl ones just disappear.  I also want to add some shiny sequins to the sides of the fluke, peeking out from the fringe.  Also, right now the tail bunches a little too much around my ankles, so I'm pondering how to streamline it a bit.  

Let me know what you think!

Thursday, November 22, 2012

Cellophane Tinkerbell Fairy Wings


I have been wanting new Tinkerbell wings for a long time.  Her wings are really tall and intricate (at least, in my mind) and so I was a little intimidated by the project.  Wing structure is crucial, and finding a strong enough structure for wings that are that big and vertical seemed really tough.

Then, I discovered Wonderflex.  This stuff is great.  It's a low temperature sculptable plastic sheet with a woven fiber back - people seem to mostly use it for making costume armor or other "hard" costume pieces that don't lend themselves to fabric.  It's paintable and sandable and .. well, it's COOL.

My first project was a Sleeping Beauty crown and since that went so well I decided to try for something a little more ambitious.  I found Vickibunnyangel's fairy wing tutorial and got inspired..  Here's the end result:


The wings took me about 2 days to make.  I thought I'd taken more step-by-step photos but .. I guess I just got too excited or something.  Here's how I did it:

Materials:  
  • 400 series bristol vellum (2 big sheets, from Michael's)
  • Gold spray paint
  • Clear gloss acrylic sealer (probably didn't really need this)
  • Spray glue
  • Iridescent Cellophane wrapping paper
  • Mod Podge Gloss
  • 16 g wire
  • Wonderflex
  • Gold leaf paint
  • Flowers for decorating
  • Foam cushion (I used a little piece of yoga mat)

  1. Trace out the vein design on the Bristol board.  I did the upper and lower wings separately.
  2. Cut the veins out carefully with an x-acto knife.  (my hands got SO tired)  
  3. I made sure there were fairly thick support veins along the top edge but I left the outer edge open.  I like the way this looks but I'm wishing now that I'd added a little more support along the outside edge because the finished wings are a little bit saggy along the outside.
  4. Next I painted the wing frames with shiny gold spray paint.  I did 2 coats on each one and then sprayed with an acrylic sealer - probably not necessary but I don't want the wings to fall apart if it rains!
  5. I sprayed the frames with spray glue, and laid them down on sheets of cellophane, carefully - this was tricky trying to get the cellophane smooth along the veins and took me a couple tries (it's good to have extra cellophane on hand!)  
  6. I did a couple test-runs on scraps first and learned that one should NOT put spray-glue on the cellophane - the glue doesn't dry clear so the cellophane ended up looking all spatter-y.  Not unattractive.. just not what I was going for.  Spraying just the frames is the way to go.
  7. Time for mod-podge!  I used Mod Podge gloss and a little miniature paint roller.  This worked brilliantly.  I did 3 coats on the front of each wing and 2 coats on the back.  This beefs up the cellophane so it doesn't feel like the slightest breeze will tear it, and seals the whole thing really nicely.  It dries perfectly clear and it made the wings really feel like wings.
  8. While the mod podge was drying, I got out the wire and bent it around until I had the frame right.  I used one piece of wire for each side - down along the top of the large upper wing, looping back up and then around the bottom of the lower round wing.  I made the wires loop down below the bottom of the lower wings to make a brace that slides into the top of my costume (I prefer this method to wearing wing straps).  (wish I'd taken a picture of this part! that would make it easier to explain)
  9. Because my craft room is a little messy I ended up accidentally using 16g wire for one wing and 18g for the other.  As I was testing out the finished wings, the 18g side was really saggy and I ended up having to add a second 16g wire to that side - not ideal, but note-to-self - when in doubt, use the heavier wire!
  10. I attached the two bare wire frames together using wonderflex scraps, basically making a rectangular brace that holds the frames in place and that I can slide into the back of my costume.  (There's also a strip of wonderflex underneath the flower to make the wings stay a little more vertical.)
  11. Then I attached the wings to the frames with a long strip of Wonderflex.  I used a hair dryer to melt just a few inches of Wonderflex at a time, then smoothed the sticky Wonderflex down to the wings, covering the wire so it was trapped underneath the Wonderflex.
  12. At this point I tested the wings to see how sturdy they were and added a second wire to the right side since it was kind of floppy.  Also I added a wire to the bottom of the right wing (and just a piece of wonderflex to the left wing so it looked symmetrical). The wonderflex is amazing.. you can just keep piling it on to add strength.. but it also adds weight so don't get carried away.
  13. I painted all the Wonderflex with gold leaf paint and then used hot glue to add the flower and leaves, covering up the top of the back brace.  I tried the wings on - they looked GREAT but kept sort of sliding sideways.. probably because one wing had two wires and twice as much Wonderflex so it was a little heavier.  Grr..
  14. To solve this problem I cut a small piece of yoga mat and hot glued it to the inside of the back brace.  The wings now slide inside my dress and bra, and nestle comfortably between my shoulder blades and I can spin and dance and play and they aren't going ANYWHERE.

So that's it!  I had so much fun making these that I'm almost sad to be finished with them.  I may embark on some new light-up snow fairy wings next.... :)


Wednesday, November 14, 2012

Handmade Sleeping Beauty Crown

My Wonderflex arrived yesterday!!

Wonderflex is a sculpting material that's basically a heat-moldable plastic sheet with a fiber backing. It sticks to itself really well, so multiple pieces can be fused together, and it's easy to shape with just a hair dryer or heat gun. It's used a lot for making Cosplay armor or other "hard" costume pieces, but it's lightweight, paintable, sandable and really easy to work with.

 I didn't have a project in mind - I just know that multiple times in the past, I've wanted to make accessories or costume pieces that are harder or more armour-like than fabric can be, so I ordered a sheet of it, and I'm having so much fun.

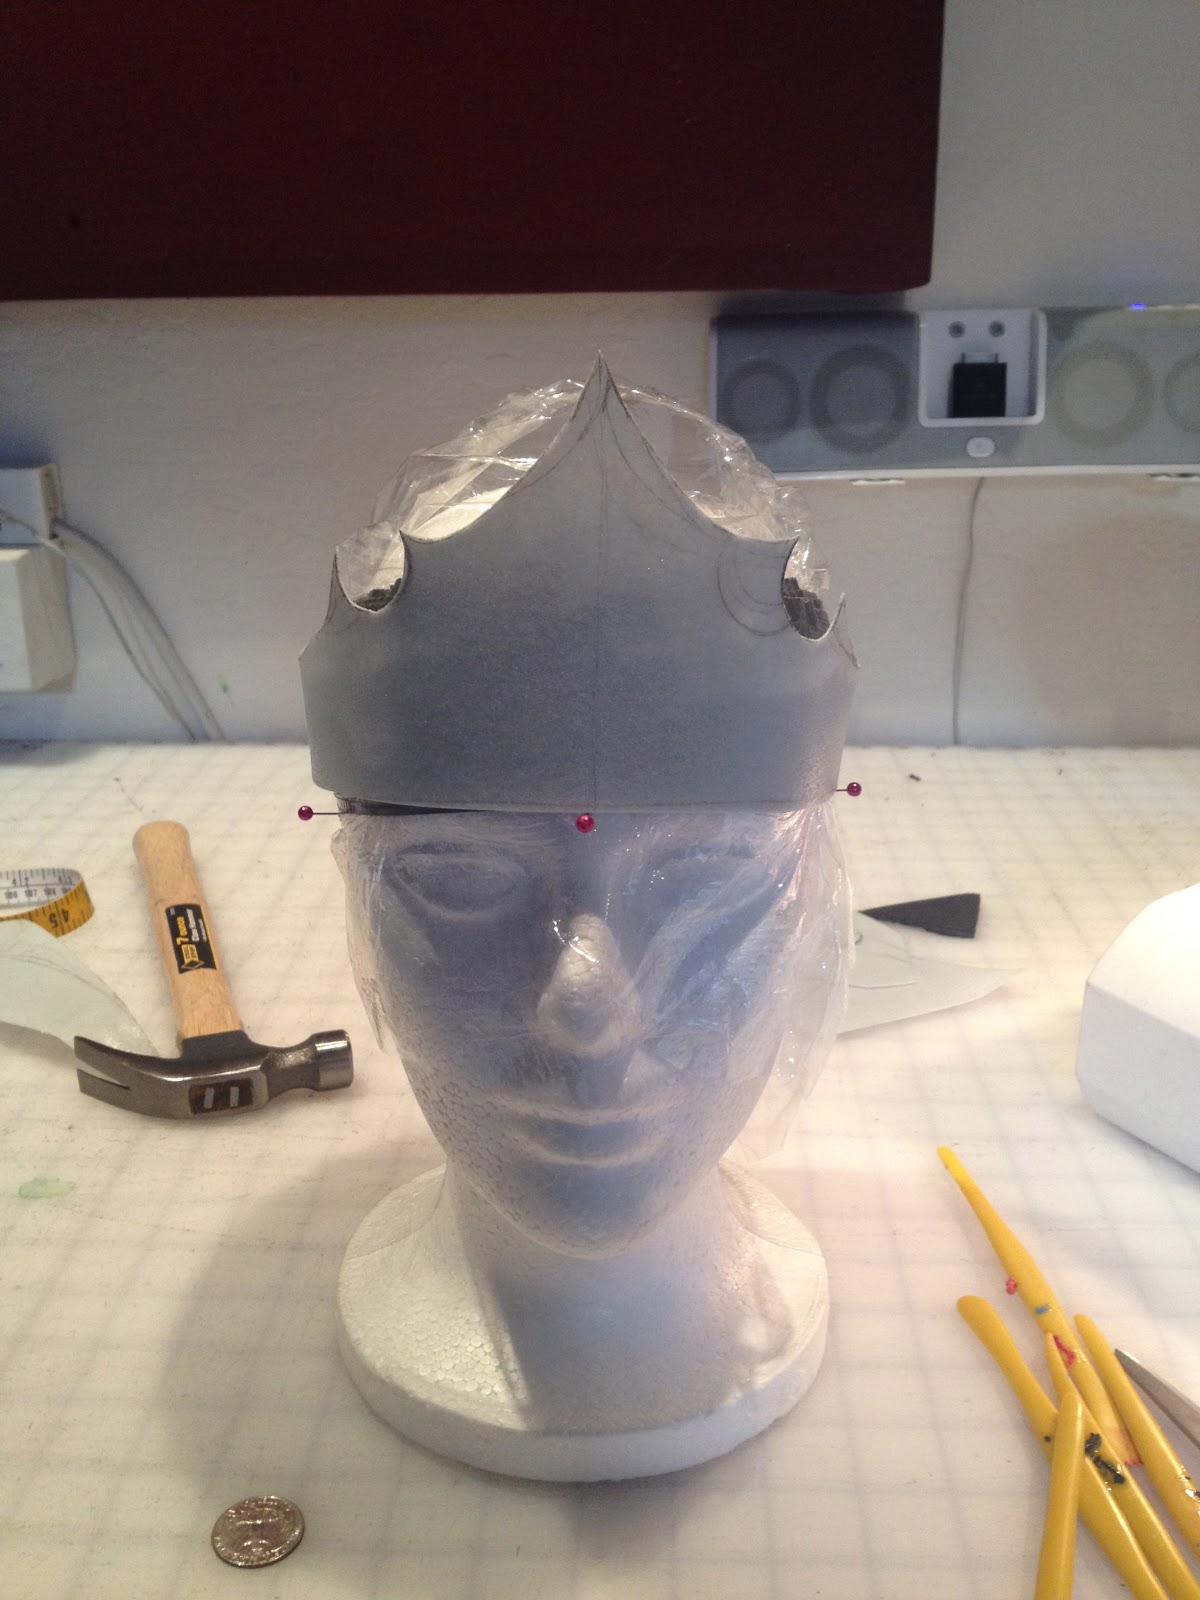
 I wanted to start simple so I decided to do a Sleeping Beauty crown for my first project. It's a simple circle without a whole lot of shaping, so I figured it'd be a good learning piece. It turned out just gorgeous.    :)


Bare wonderflex.  I traced a quarter to be sure the circular cutouts on the side front of the crown were even and perfectly round.

The piece I originally cut was a little too small so I bridged the back seam with another small piece, ending up with two seams (but it fits PERFECTLY)

I sanded and primered, then spray painted it bright gold.

Then I painted it with gold leaf and highlighted again with the gold spray paint.  Then I finished with a spray sealer with a glossy finish.

Jewels!!!


It fits really perfectly - it's light and flexible and comfortable, and the multi-hued gold paint really gleams.  So happy with how this turned out!

Saturday, February 25, 2012

Little Mermaid Seashell Bra Top

My Ariel seashell bra has juuuust about given up the ghost.  It gave me years of (mostly) loyal service, but elastic and sequins only last so long, and it was time for a new one.

I started with a very comfy purple bra from Victoria's Secret.  Hopefully it'll have lots and lots and lots of wear!

For the shells, I got "serving dish" shells from World Market and got some porcelain paint from Michael's.  I did a purple to white gradient and then baked the shells with the paint on, and this created a sort of porcelain-style glaze.  It made the shells both shiny and dimensional, and also added a lot to their durability (important, when you're wearing these to loads of kids' parties).

I drilled a few holes in the shells so I could sew them onto the bra, in addition to sticking them on with industrial strength velcro.  (In rev.1 of this style of seashell bra, I just relied on the industrial velcro alone.  This works fine for walk-around Mermaid shows, but as soon as I started using it for swimming mermaid gigs, it became a bit of a problem: the water in the pool just LOVED to scoop in over the top of the shells and pull them right off, where they floated daintily to the bottom.  "Okay kids!," I'd call, with my hands covering the empty spots on the bra, "Who can dive all the way down there and get Ariel's sea shells?")

I wanted extra-fancyness so I added some blue jeweled trim to the neckline and dangled two different sizes of pearl trim to the bottom.  Then I did the labor-intensive sequin application.  The sequins are GORGEOUS - they're little bitty iridescent seashells and they sparkle and shine and I just love the way it turned out.

I finished up with a sea-anenome-looking flower with a jewel replacing the center, right in the middle.  There's velcro all along the inside too, so I can easily attach a flesh colored bodysuit to wear underneath (so I'm less "naked" for the kids' shows).  It's super comfy and it looks absolutely amazing.. I'm SO proud of it!

Today I'm doing a swimming mermaid party (thank heavens for this gorgeous weather!) and so I'll have the opportunity to give it a really good water-test.  Here's hoping it all holds together okay.  :)

Sunday, November 14, 2010

Tinkerbell Makeup Tutorial

I just found this wonderful web site: Nature's Knockout.  There are tons of videos and articles about makeup, and they are really well done.  The products they use are all-natural (I LOVE that) and the techniques are demonstrated well.

Here is my favorite:  a Tinkerbell Makeup How-to Video.  Enjoy!